

Heil microphones hold a respected position in the amateur radio community–producing some of the best SSB/AM/FM audio for all major brands of gear. Among the “Big Three” rig manufacturers, Icom has taken a different path to audio input. Yaesu and Kenwood chose to design around the traditional moving coil dynamic microphones (advancing from older Low-Z carbon capsule audio input stages)—and Icom chose to develop on an electret element platform–something more common to mobile mics and VHF/UHF rigs.
The major point here in this article is DO NOT connect your Goldline series microphone without the correct interconnect solutions. Doing so has the potential to turn ones Goldline into smoked out rubbish…
The difference between these approaches is significant. The table below illustrates how this is:
| Dynamic Element | Electret/Condenser Element |
| 1. Element translates audio vibrations into voltage via a moving coil, working essentially like a speaker in reverse.
2. As the wire coil moves through the magnetic field, it generates a tiny electrical current (voltage) via electromagnetic induction. 3. Because of this inductive method of translation, the coil is not powered by bias or phantom voltages. 4. Input to rigs requires a greater amplification range to boost the signal well above the noise floor. |
1. Element translates audio vibrations into voltage via a tiny capacitor with two plates—a fixed backplate and a thin, flexible diaphragm. These consist of a special ferroelectric material that holds a permanent electrostatic charge.
2. Because the element also contains a FET to act as an impedance buffer and preamplifier, it must be powered by a small external DC bias voltage. 3. As a result of the boosted signal, the need for amplification at the rig is less than that required for dynamic mics–providing better range and adjustments of the input signal. |
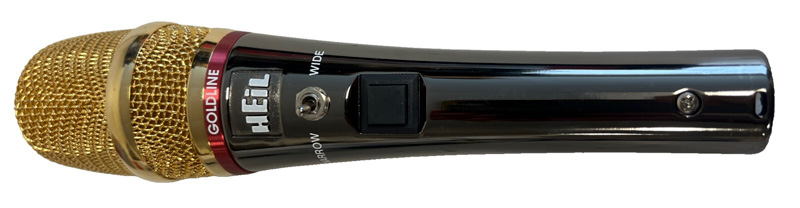
By intent and design, Icom has followed the electret route throughout most of its history. Many electret mics have been made and matched as OEM by Icom—and the Heil Amateur Radio division long ago stepped in as a major player for design-match products carrying the IC/iCM brand markings. But one does not have to choose one element platform over another—there are many formidable dynamic microphones from many makers that can be added and provide exceptional audio. The Heil ‘Goldline’ series is one of those. Comprising a selection beginning with the original GM and ending with the currently produced Gold Elite and the Gold Elite Vintage models. What is discussed in this article is relevant to all models in this line.
THE GOLDLINE SERIES
The Heil Goldline microphone series was introduced in in late 2000 as the GM model, first referenced in early product announcements and reviews from the American Radio Relay League (ARRL Letter), with the professional-audio variant (the Goldline Pro) following in 2003. Version 1 (GM4) was also introduced that year. The Goldline series is unique as it features a dual-element switch that gives amateur radio operators two distinct elements and microphone profiles—a wide-range studio audio setting and a narrow articulation setting—housed in a distinctive gold finish.
At the flick of a switch, the mic shifts between a wide-range element (producing full-range, broadcast-style audio around 60 Hz–16 kHz with a peak at 2 kHz) and a narrow element (such as the HC-5.1 in contemporary models) designed to roll off muddy low frequencies and boost speech articulation for contesting or DXing. Tailored specifically for Single Sideband (SSB) transmissions, this permits operators to cut through static by focusing peak transmitter wattage on high-intelligibility voice frequencies rather than wasting power on deep bass rumble. Heil referred to this as the “Dream Machine.”
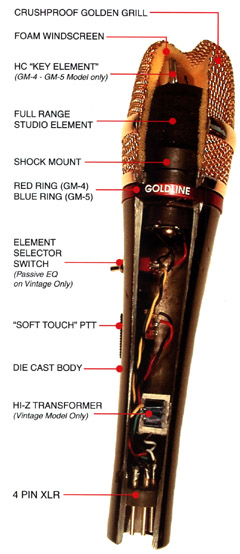
I believe that choosing any quality microphone platform can be both a hobby in its own right–and the vaunted goal of running the best station possible. This writer has been afflicted with all of this, along with the insidious disease of GAS–Gear Acquisition Syndrome! But this hearkens to our early roots as experimenters, and the satisfaction of how to do things well for ourselves. As one can see from the cutaway image above, the Goldline series is a formidable accompaniment for modern Icom rigs such as the IC-7100, IC-7300 (all flavors), and such venerable rigs such as the IC-751A. With all of this goodness possible, let’s look at how to get this dynamic element microphone into premium synchronicity with Icom models–particularly the IC-7300.
THE CHALLENGE
The design standard for bias voltage in Icom radios is 8VDC. This perfectly powers the Field Effect Transistor (FET) in electret element mics that serve a dual purpose in reducing and buffering the output impedance of the circuit–and to work as a preamplifier prior to a rig’s audio input stage. One does not want to put this voltage across a dynamic mic coil, as it risks toasting the coil. As we can all agree that this is not a good thing, steps must be taken to isolate this voltage from the element. We will now look at three strategies to accomplish this.
Strategy 1–Purchase an isolation adapter.
This by far is the most elegant and quick solution to the problem. Heil Radio offers the CC-1-I adapter cable. This interconnection contains an integral 1μf non-polarized (NPO) @ 16WVDC tantalum cap, which allows audio signals to pass–but blocks the 8VDC bias power from entering the dynamic element. These 4 pin XLR adapters retail for $35-50 depending on the retailer. This places at the top of solution choices.
From DX Engineering:
https://www.dxengineering.com/parts/hls-cc-1-i?seid=dxese1#overview
Directly from Heil Radio:
Strategy 2–Add an NPO blocking cap in the mic housing or custom input to the Icom.
In this approach, a 1μf @16-35WVDC NPO tantalum capacitor is installed by cutting and splicing the component in prior to the Pin 2 terminal of the 4 pin XLR connector at the base of the mic body–as shown below. The cap leads need not be oriented to polarity, as this is a non-polarized capacitor–and either lead provides identical voltage blocking.
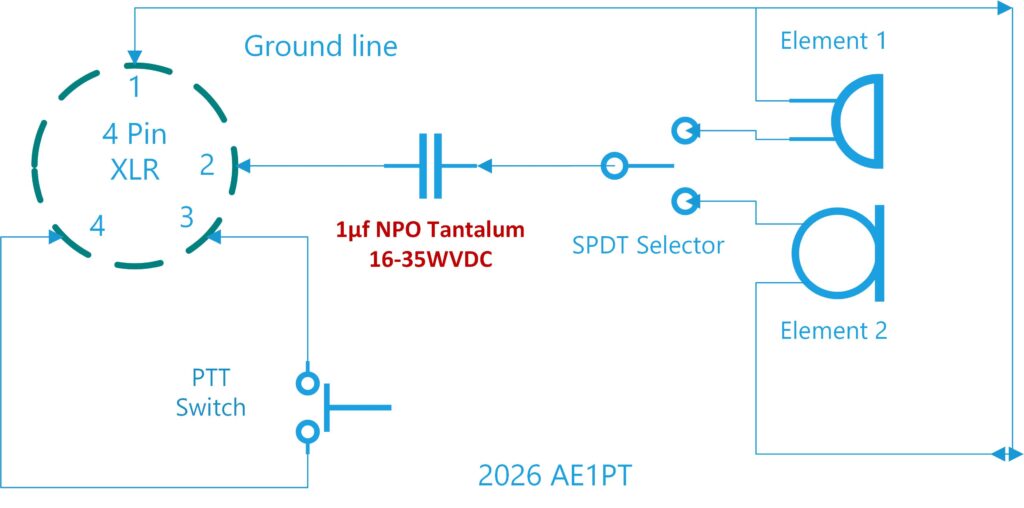
Inside the cast mic body, the proper pin reference to the 4 pin XLR connection is as follows:
- Pin 1: Ground / Shield (Audio/Shield ground)
- Pin 2: Microphone Audio (Mic signal) This is the wire that is broken and the cap inserted.
- Pin 3 & Pin 4: Push-to-Talk (PTT) (Transmit control switch circuit)
If using another cable adapter or homebrew patch box, interrupt the hot mic wire going to Pin 1 of the standard 8 Pin Icom mic jack, and insert the capacitor as shown here:
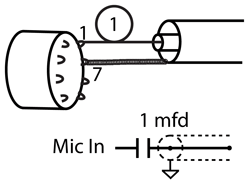
This addition will not negatively affect using the mic with other adapters intended for dynamic mic rig connection. Find these caps for under $10 at Amazon, or at DigiKey and Mouser:
Strategy 3–Build Your Own Patch Box.
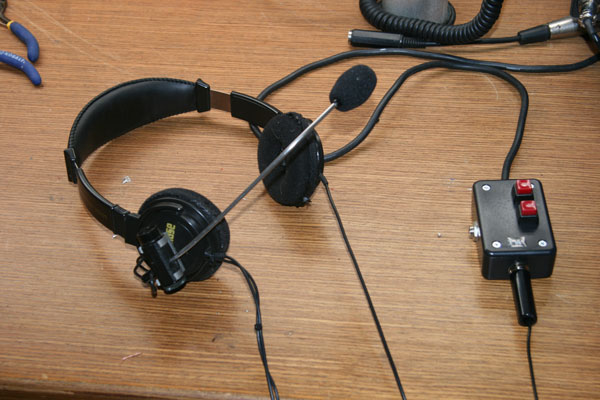
It is said that with enough stuff in a junk drawer, an industrious and curious ham can build just about anything. The key is to convert a three or four section 1/4″ phono plug into the 8 pin and 2 section PTT circuit. This takes a bit of planning and parts scrounging. Shown below is an example of an electret isolation and PTT interface box I made for my Icom 751A many years ago, that internally includes the blocking cap for my Shure 10A dynamic cobbled together headset:
SETTINGS
Adjust the mic gain by watching the ALC meter. Try to set the total ALC to 50 or 60% of the maximum level.
Usual mic gain will be set between 60 to 80. Pay attention to the ALC. Compression On at, 1 or 2. Never any more, but anectdotal ham lore relates some happiness at 3. This will be a voyage of experimentation, and sorting signal report lies from reality…
- Equalization settings:
Normal conversation Bass -1 to +1 Treble +3
DX and contest use Bass -3 Treble +4
These are merely beginning settings. You will want to listen to your signal in a second receiver and make small minor adjustments to tailor the audio you desire.
The receiver also has a great equalization circuit so adjust the treble and bass to your listening preference.
NEXT STEPS
If one has made a true commitment to deploying a variety of dynamic and condenser microphones, then the next level is to add a simple audio mixer board. These solutions run from $15-60 on Amazon and other sources. For most simple applications such as per-amplifying a dynamic mic, or powering a studio or condenser mic with 48VDC of phantom power–a two or three channel board will do the trick. My recommendation is for an actual board that gives tonal and gain adjustments right in front of the user. There is an even greater realm with ESSB, which essentially requires dedicated preamps and equalizers. Factually, with the Icom 7300 this is a fantasy, as the underlying firmware limits the bandwidth to 2.9Khz.
However, by careful experimentation with the native treble, bass, and compression settings of the Icom, one can achieve a result comparable to ~3.1Khz quality. Below are shown some possible mixer/patch suggestions that may be had on Amazon:
IN CONCLUSION
It is not difficult to connect a dynamic mic to an Icom rig. Other platforms, such as a condenser or ribbon mic require extra steps–but follow the same general program. Just understand that your gain settings will likely be much more than set for an electret mic. With more professional mics it is recommended to research and deploy other solutions–such as 48VDC phantom power–which is best supplied by an inline XLR preamp–or an audio mixer board. However, the Goldline series will provide yeoman performance on any Icom!
Here is a nice SpewTube video that discusses the details:
Some thoughts on adding mixers and preamps:
Authors Note
This article resulted from prompting to begin writing a few microphone articles pertinent to the IC-7300 and others of that input ilk. A more full-featured accompanying article will follow in the future. But great thanks are due to Bob, KC2ORM for buying a previously loved version of this series–and inquiring on the KLARA weekday net how to best make it work! PS. Don’t just take my word for anything. Do your research and planning. Then there is no blame laid for the accidental release of magic smoke…